Friday, February 28, 2014

A start up in Pencil Shading.

Art is something which encompasses a diverse range of human activities, creations and modes of expression including music, literature, film, sculpture and paintings. Do you know how many types of arts are there? A lot, if we start listing types of art then we can’t finish it very soon. Here, I have some of the them .The different types of art include: Drawing, Sculpture, Architecture, Printmaking, Painting, Electronic media such as Computer and Digital graphics, Visual design, Graphic design, collage, Photography and Post-modern appropriation, Re-Contextualisation, Happenings, Installation, Land Art, Video Art, Body Art, Conceptual Art, Fine Art, and Creative Art and many more. I know it is still long list but the question is that is learning art easy? Some may say yes, other may say no. But I would say nothing is hard if you are eager and passionate to learn something. First thing you should ask your self is what type of art do you want to learn? If you want to learn Drawing and Painting then you are at right place.
Before going further I would like to inform you that you should already be known to basic drawing like drawing objects, shapes and Shading strokes. And also about the basic material you need for it like special paper and pencil sets. If you don't know about materials go to Basic Material.
As we know that there are many techniques in Pencil shading, so your useful technique actually depends on your goal of what you are going to draw.For revising I have some of the styles and techniques here, they are Realistic or not Realistic, Cartoon type, 3D, Naturalistic or Representational.So chose your style you are comfortable with.
Let’s start with Normal shading you need Sketch or Graphite pencil set and Cartridge Paper (A1 size)
The main and basic part of pencil shading is moving your pencil back and forth gently.
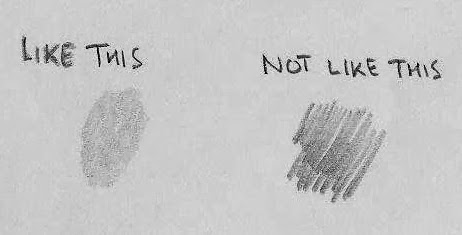
First with a very little force press your pencil lead on paper and then move your pencil smoothly like butter to other side,as shown in picture.Let the graphite get spread on paper in even tone.For now just keep trying doing normal shade.I would suggest you to buy basic shading book which re extremely helpful for beginners and are in budget too.In next post we will talk about drawing shapes and shade in them.Until that keep practising..!

1st stage of Pencil Shading

In last blog, we talked about basic strokes and now lets move on to next step.This step is drawing shape and shade in it.Did you buy any Shading Book(shapes)? Yes? then its great! But if no, then don't worry you just should be knowing how to draw shape and then you can shade in it.From now we are turning alittle bit towards realistic pencil shading.
You need:
Pencil set, Paper Eraser and Sharpener.
Our shade basically depends on the angle of our object to light.I have a picture which will help you understand what I am talking about.You can see at different angle shaded areas gets different.So starting from here firstly start drawing a shape like circle or square with very light border. Then Assume that light is in top left corner.Start light shading in whole shape.Keeping the area lighter which is faced towards light,the area hidden to light shade it darker. This show reflection of light on object and makes it look like real. Then give it a darker border so it creates a feeling of actual object.Make as many shapes you can and shade it. I know first you aren't going to make it perfect nobody can in first try,but remember the saying," Practise makes a man perfect".Keep practising on simple shapes (circle, square, rectangle, or triangle) or objects(boxes,egg, vegetables or fruits)chose whatever you prefer.Then shade in them keeping light from any of the corner or side.We will next talk about next step that is making more complicated shapes and shade them.
I have some of my drawings below here which will give you some idea to what to draw at this stage:
        First simple shapes and shades
        And next time we will learn a bit complicated
I will always provide you some of my drawings in every blog.Share your ideas, thoughts and concerns with me.

Thursday, February 27, 2014

2nd Stage of Pencil Shading

Hope you are doing well today.Have you ever tried colour pencils for shading? Well today we are going to talk about it. We drew many simple shapes but with only black pencil though.Now what I want you to do is add some colours to your drawings. Its very similar, simple and interesting.
You need.
A paper, Pencils,Eraser, Pencil colours.
Take a paper and start drawing some shapes or fruits or whatever you like.Then as we done before asume that light is coming from one corner(any corner). Then start shading it light with pencil colours.Do you know why I suggest to shade lighter first? Its just because you can easily shade lighter in to darker but it becomes very messy when you try to reverse it as darker shade to lighter one. Just keep in mind in simple way that "light is always First".

As shown in given picture try to shade the original colours to the drawing.Like red for Carrot and green for Okra (Lady-finger). This bring originality in drawing. See how I shaded the light part first and took it up to dark side. It means the light is coming from top-left corner so I shaded it that way. Its not always necessary to keep the light on any one corner-side, keep where ever you prefer but shade it in that way so it shop up as real.As the angle of object to light changes, the shade is also changed relatively.


Keep practising different shapes...play with colours and enjoy.

Keep sharing your ideas,thoughts and concerns.

Pencil shading video.

I hope you all are doing well and are practising pencil shading.I thought that written explanation might not help to all of you and there are many visual learner out there,so I have a video teaching you whatever we covered so far and also some more interesting things. This is a video by Mr. Pearson, so he will be teaching you shading in solid shapes.In this video you can see how he draws few shapes and shade in them differently.He uses different techniques and also explains about light reflection on object. See how he shade some areas with less forces(the areas faced to light) and some dark areas and shadow.I also want you to notice different techniques he covers as we are not going to talk about them much.Watch the video and tell me if it was helpful or not.Should I keep posting different videos tutorials or you are doing okay with written description 

Wednesday, February 26, 2014

3rd stage Pencil shading

Previous
We already tried drawing simple and some complex shapes and shade them,even in various colours.Now I think we can move on and try some thing out of the box. Have you ever seen or imagined a picture of underwater or a group of birds flying in the sky???or a house in the middle of ocean or a flying car? I know this sound strange but there's nothing wrong in imagining such things, specially for art.Art is all about imaginations and creativity.Today I want you to draw the things you like and it really doesn't matter what you draw.Why don't you try to do it in my way its like close your eyes, take a deep breathe and imagine what you like, where you want to be,the place that is not even there;and then keep a click of that in your mind and put it down on the paper.Trust me every time you try this you would definitely come up with various things.Then create a sketch of that things.It shouldn't have to be any specific thing you can do any design or creative drawing.I want you to draw some thing in creative too.I have a creative drawing of mine which shows some level of creativity.We will talk about creativity in next post in more details and then soon we will also talk about water colour painting.But before that I hope you come up with atleast one piece in both. Let me know what you have tried,I would love to know about it. Until that Keep sharing your ideas, thoughts and concerns with me.

Tuesday, February 25, 2014

Make Greeting cards at Home

Last month it was my friend’s birthday, I gave her my handmade card. Everyone was asking me where did I buy that card from? Then I told them that I didn’t buy it I made it, everyone was really impressed, and they asked me how did I make it? So that inspired me to teach you how to make cards easily with no time and no efforts.
I know in today’s running world, who has time to make card why don’t just buy one and make life easier. But you know that many people love handmade things, so can’t you make something by yourself for your near ones. It’s simple, easy, and believe me you will love this.
You need:
A colour paper, pencil, sketch pens, glitter pens, scale sticker of flower or anything you like.
First fold the colour paper in half and then on the front side make 3 squares with the help of scale, One on the top-right, second in left- center and third in bottom-right. I know I have star shape but draw whatever is easy for you.. Then cut the inner part of the border carefully (if you are less the 13tell your elder to do it). . Stick some sticker of flower or of anything you have in those 3 squares. Then open the card and in side on top left corner make a flower with 3 or 5 petals with red sketch pen and make a curve line from flower to the center on both sides. And then on one side draw leafs, keep some space between each leaf. Do the same on the left bottom corner. Then In the center of it make two parallel lines, and keeping 3cm space draw another two parallel lines. The first pair of line should be 7 cm and second 10 cm. Then cut the lines carefully. Then press it on other side to make its crease in opposite direction. Then make a creative border around it with different colour pens. Draw some small stars inside the card. At the end add the wishes you want to and here is your card ready. Draw some shapes according to the occasion, like birthday then cake.
Why don't you make your own designs for cards.Keep sharing your ideas,thoughts and concerns.


You can check some designs and wishes to write by this link:

Monday, February 24, 2014

Links of videos showing how to make greeting cards at home.

Do you think it is easy to find anything on internet?Probably it’s not. It’s not just type the thing in Google to what you are looking for. You have to go through a lot of stuff which might be unnecessary or unimportant. I was looking for some designs of greeting cards on internet and after a long time watching a lot of videos I finally found good design. Now I understand how difficult it is. So this blog is to help you find good designs for greeting cards. I have some link of videos to which you can watch and make your own card. It won’t take your much time.
In these videos you will find different ways of making pop up cards, simple but classic look cards, seasonal cards and also small cute cards. The list of things you need to make a card are also provided in these videos so you don’t have to worry about that too.


Keep sharing your ideas, thoughts and concerns.